Logitech C920 (and it’s variants) is appreciated for it’s good quality 1080p/30fps video. It produces good colors, good contrast and handles well various lighting surroundings. Although it is produced in 2012. It is still relevant for video streaming today in 2022.

When it is first installed and run, it does show some of it’s power, but it does not show it’s best. That is understandable: default settings are decided to show good overall video that can be used without much adjustment. Clearly that is targeted for inexperienced users. And indeed default video looks good even when lighting is not the best.
But you are reading this article because you want more, you want to get the best possible video from this camera.
First the first
Well here are some bad news. In photography light is everything. In videography light is even more. To get great video you have to provide good lighting. If you have only room ceiling light and desktop lamp, you cannot expect astonishing results. Not even with far more expensive camera.
Lets repeat, Logitech C920 can provide good video under decent room or desktop lighting. That is actually what it does on default settings. For more you need more light.
For photography there are three important factors that influence exposure of photography: sensitivity of the photographic sensor, aperture and duration of exposure. On Logitech C920 you cannot control sensitivity of the sensor and aperture. Those are fixed characteristic. I could not find published info what values are for these elements in this camera, but at the end, it is not important as we cannot influence them anyways.
What we can control is exposure duration. And it seems enough. Let’s se what we can do.
Choosing exposure value
We can set and control duration of exposure only. By default it is set to automatic, meaning, camera adjusts it by itself to get properly exposed photo. And that is why you got good lit video by default.
You can guess, to get best result you have to turn of automatic mode, and set exposure by yourself. Automatic mode leans toward getting video that is not to dark or too light. We have to turn automatic mode off because we want the best possible image. Properly setting up exposure is crucial for quality of the image.
And that leads to new issue. In photography, when you properly balance three mentioned parameters you get good photograph. In video, there is forth parameter – frame rate. It specifies how many single images are recorded in a second. Logitech C920 can be set to several frame rates but we are interested only to 30 fps.
| Exposure | Duration |
| -2 | 1/4s |
| -3 | 1/8s |
| -4 | 1/16s |
| -5 | 1/32s |
| -6 | 1/64s |
| -7 | 1/128s |
| -8 | 1/256s |
| -9 | 1/512s |
| -10 | 1/1024s |
| -11 | 1/2048s |
So we can conclude that fourth parameter is fixed too. It is 1/30 second for single frame in a video. That limits our options for exposure duration.
What exposure duration we do have at out disposal, then? For some reason Logitech decided to represent exposure duration in some non descriptive values, from -2 to -11. Luckily, someone managed to decipher what those values represent are shown is side table.
It seems now we have lots of options but it is not quite true. To get nice cinematic video, rule is that exposure time should be twice the duration of one frame in a video. For 30 fps video, that duration is 2 x 1/30 seconds. That gives just one option – to set exposure value -6 (1/64 s).
So, conclusion is, as we turn of automatic mode we do not get more options, all we get is one option – to set all parameters at required values to get the best video.
Choosing White Balance Value
In short, White Balancing camera means telling it what color temperature of the lighting is, so that it can compensate and provide video with natural colors. Logitech C920 may be set to White balance values from 2000 K which is very warm orange colored light to 6500 K which is cold blue colored light.
White Balance option is also set to automatic mode by default. That allows camera to self adjust to temperature of the lighting and it does pretty good job at it. Problem is, if you have anything in your scene that changes color, automatic White Balance would react to it. You do not want that to happen so you have to turn it off.
After turning it off, you simply set White Balance that produces most natural colors in a video. And that is all you can do. If you are not satisfied with setting set it to the best as you can and you can deal with better coloring later in some (advanced) application. It is important just to have White Balance fixed.
Choosing Focus Value
Focusing is also set to automatic mode. It is general consensus that auto focusing on Logitech C920 is not done well. It is easily triggered, works slow, and often focuses wrong object. So, simply turn it off and set focus to get what is needed sharp to be sharp. You do not focus to start hunting in middle of video recording or live streaming.
Setting up camera
When you unpack your Logitech C920, is all you get is camera that you can stick into USB port (Side note: do not connect camera via USB hub, it has to be connected directly to USB port on PC). You do not get any software. You are expected to download software from Logitech site.
Logitech provides several applications that allow setting up camera, but all are bulky and setting options are not great. Some even cause lag in video stream from camera. In short, you do not need that software. All you need is to have drivers installed and Windows should take care of that at the moment you turned camera on. If you are not Windows user then I cannot help you as I have no experience other than that, but still information from this article is helpful, all you need is to manage how to get to the settings of a camera.
 What I am recommending is to get simple free tool designed specifically to set up cameras: Roland Weigelt’s CamProps . It is very simple and light application that does job exactly as needed.
Other than having access to web camera settings, you can also save those settings as profiles for later use (and that option is actually vital for owners of Logitech C920).
After you start application click on option Add new configuration. That would ask you for profile name (may be changed later) and save current camera settings under that profile name. Then click on sliders button ![]() to open camera configuration. That would open standard camera configuration tool that is assigned to that specific camera.
to open camera configuration. That would open standard camera configuration tool that is assigned to that specific camera.
Before opening configuration you should open some application that would use and display video form camera. That may be OBS, Skype, Viber, some video player or any other application that has capability to connect to webcam and show video. You need to see video to check how video changes while you are changing settings.
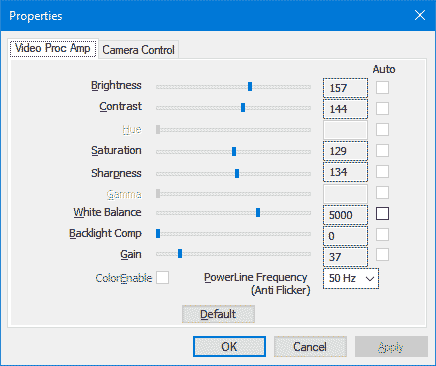
For Logitech C920 configuration should have two tabs named Video Proc Amp and Camera Control.
Switch to Camera Control first.
Uncheck Auto boxes on both Focus and Exposure.
Set focus so that everything that is needed to be sharp is sharp.

Set Exposure to -6. Remember, that is 1/64s exposure duration which is recommended for 30fps video. You will probably notice that video becomes darker, maybe too dark. We will take car of it later.
Uncheck Low Light Compensation to turn it off.
You may set Zoom, Pan and Tilt as you like. Do not get confused that Zoom works only on few slider positions and rest is maximum zoom. That is OK. Pan and Tilt work when camera is in zoom mode.
Now switch to Video Proc Amp.
The first thing you should set here is Gain. Set it to zero. Video would probably get even more dark.
Remember when I said that ISO of the Logitech C920 is fixed. Well, it is, but this Gain option acts like variable ISO. It brightens image read from video chip. This is not Brightness which exist as separate option. This is some kind of software pumping chip to provide brighter image. Guess what – it does make image brighter but also provides noise, blur and some other not wanted artifacts to it. Therefore we are setting it to zero.
What you get now is probably pretty dark video. Now you should understand why it is said that you need lot of light. Camera is now set to provide the best quality video, but to make it so, you have to provide enough light.
Let’s assume you have proper lighting. Turn it on hoping you get well lit image.
Lets handle other settings in this panel.
When you have scene properly lit, you can finally set White Balance. Remember, White balance extremely depends of lighting, so you have to set lighting first and then adjust White Balance. As I said before set it to your own linking. It should provide as natural colors as possible, but if you want some special coloring effects feel to do so. If you are targeting most natural colors and cannot get it with this option, do as best as you can and then use other software that would process video to improve colors even more.
Brightness and Contrast are known options. You can set it as you like.
Saturation may help getting proper color tone of the video so you can use it along with White Balance.
Sharpness is also well known feature. Use it as you like, but avoid going to sharp. That would not result in the best possible video.
Turn Backlight Comp to zero.
Set PowerLine Frequency for whatever frequency is used in your power line system. In Europe it is 50 Hz, in USA is 60 Hz . This helps avoid flickering.
Not enough light
If light you have is not enough, you can use Gain option to lighten it a bit. My recommendation is not to go over value of 30. That is where artifacts became quite visible. If possible, keep it below value of 15.
There is another solution – set Exposure to -5. That is exposure time of 1/32s. You will get beter lighted image for the cost of getting bit of a blur in movements. Actually you can see that lots of people are actually recommending using this value. Test it. If you can get proper image with Exposure set to -6 stay with it. If Exposure -5 helps handling lighting go for it.
Too much light
If light you have is too strong, dim it down. If lights are adjustable, that is easy: turn light bit down until it is set right.
If that is not possible, move light further from objects in scene or add some light diffuser to control it’s brightness.
If nothing else, setting Exposure can help there too. Just lower it below -6. It will handle light but frames would be crispier and that may not end up looking natural. Try and see.
And now Lighting, again
Did I stress enough how proper lighting is crucial if you want to get the best possible video from the camera? Let’s pay even more attention to that, because proper lighting is not just strong lighting. There is more to it.
As you already concluded, lighting temperature color is vital. It influences color cast in a scene that has to be compensated to get natural colors. That means you cannot use just any light.
The easiest way is to use lighting that is meant for photography and video. That is exactly kind of light that is needed. But it costs money.
You are maybe looking for more affordable solution. Ordinary lighting may be used. The most important factor is not to mix different lights. If you use different lights then it is very hard to handle color cast and get natural colors. Choose one kind of light and use it. If you need more light get the same kind. Choose higher temperature lighting. 5000K and higher is good (as long as all lights provide light of the same temperature). The easiest (and probably the cheapest) is to get are 6500K LED panels for ceilings. Two 24 W panels should do fine, stronger would be better.
You would probably need two lights, one for main (key) light that would light the object and one side light to fill in. Side light may be lower power. You can have additional lights for effects but that is out of scope of this article.
Avoid having light that shines to the object form the same angle which camera is looking at the object. That may be strong enough but it would wash out threedimensional feeling of a picture. Always shine light from the sides (unless you are going for some special effects).
Avoid small size lights. Those are cheapest and easiest to work with but small light sources provide very strong, harsh shadow. You do not want that in your best possible video (unless that is intentional effect). Use larger lights. Something 30 cm in diameter or more. Actually, more is better. Proper duffused light are huge. If you have no big light use diffuser to make it appear bigger. For photo lights you can get proper diffusers. For improvised lighting you can use large sheet of white or semitransparent paper, or textile. If you improvise, pay attention that lights can get hot and start fire if paper or textile touches them. Do not forget, when you add diffuser, amount of light that gets to the objects is reduced. Diffused lights must use stronger light sources.
What if you have too much light? As you could see, settings on camera are fixed and you cannot do much to adjust for inadequate light. Lights that are not dimmable are harder to handle. You can move them further from the object or use diffuser but sometimes that may not be enough. Classical video cameras use ND (Neutral Density) filters for that. It is mounted on camera lens and dims light that gets into camera. They are not expensive and are easy to get. Logitech C920 does not have proper mount for such filter but it is not hard to improvise. There is nothing that some sticky tape cannot fix, right?
One nasty issue
Well, there is one problem I stumbled upon after I got this camera. Camera settings are lost whenever Logitech C920 is turned off or restarted. I found out that it is bug in Logitech software. That is real bummer. You spend time fine adjusting everything and then it is reset and you have to set it up from scratch.
Well, CamProps solves that. As you can save profiles, whenever you need to restore camera setting you just load profile.
Conclusion
Getting very good video from Logitech C920 is quite doable. After all, that is why this camera is so popular. It is not hard to achieve, but it does require some effort. The same principles are used when professional video equipment is needed. The only difference is that professionals do have more options and they have funds to get ready made and costly solutions.
You can get very good results just buy using some knowledge and experimentation.
Everything described here may be applied not only to other Logitech cameras but also other cameras. Principles of video recording are the same for all.